Get Started with WooCommerce Stock Sync Pro
WooCommerce Stock Sync Pro is used to sync stock quantities between WooCommerce stores. It has the following functionality:
- Sync stock quantities automatically
- Match products by SKUs
- Log stock changes
- Extend functionality with WordPress filters and hooks
The plugin uses SKUs to match products between sites. The plugin syncs products which SKUs match and skip the rest. Syncing is performed over WooCommerce’s built-in REST API so it’s as secure as WooCommerce itself.
In this article we will go over the following steps to get up and running:
- Connect sites
- Initial sync
- Reporting
1. Connect Sites
The plugin uses WooCommerce’s built-in REST API for communication between stores. There are 3 steps in connecting the sites:
- Decide which site will be the Primary Inventory
- Create API keys
- Set up the sites
1.1 Primary vs Secondary Inventory
The first step is to decide which site will be the Primary Inventory. Primary Inventory acts as the master data for stock quantities. If you have two sites you want to sync, it doesn’t matter which one is the Primary Inventory. However, if you have multiple sites, please consider the following:
- Primary Inventory has to have all products which stock quantities you want to share
- Complete logs are available on Primary Inventory
- Tools are available on Primary Inventory. Tools:
- Push All – Pushes Primary Inventory stock quantities to Secondary Inventories
- Update All – Fetches SKUs and stock quantities from Secondary Inventories and compares them to Primary Inventory
1.2 Create API keys
After you’ve decided the Primary Inventory, the next step is to create API keys. API keys are used for secure communication between the sites.
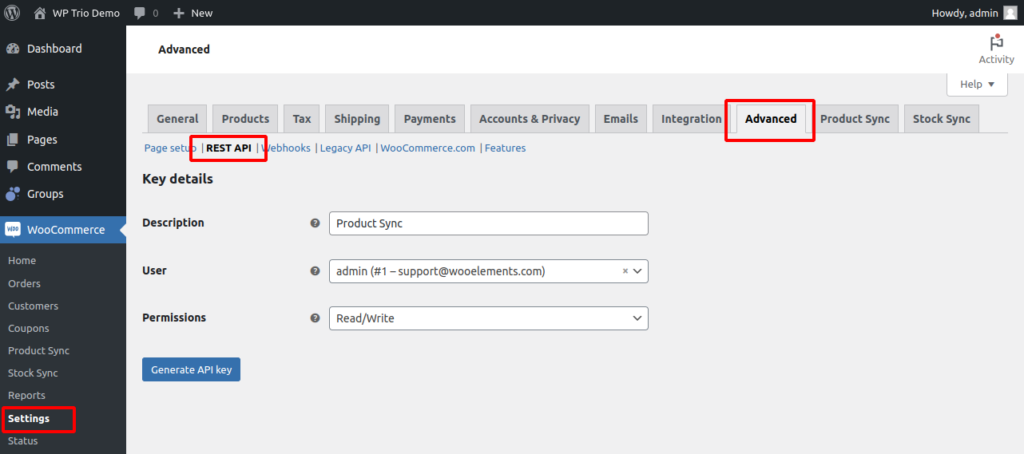
- Go to WooCommerce > Settings > Advanced > REST API
- Click Add key
- Enter Description, for example Stock Sync
- Select User associated with the API key
User must have Administrator role - Select Read / Write under Permissions
- Click Generate API key
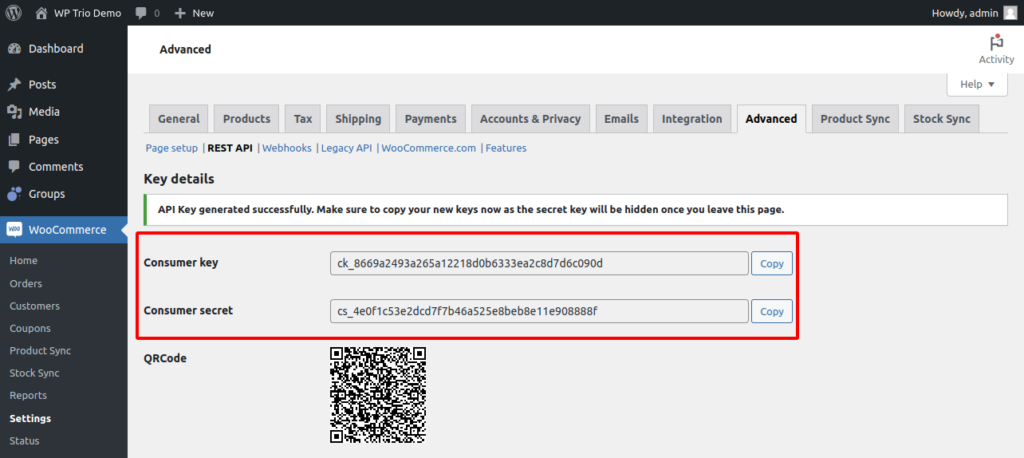
- Copy Consumer key and Consumer secret somewhere safe. They are needed in the next step
- Repeat steps 1 – 7 on all sites you want to connect


1.3 Set up sites
Once API credentials have been created, the next step is to set up the sites.
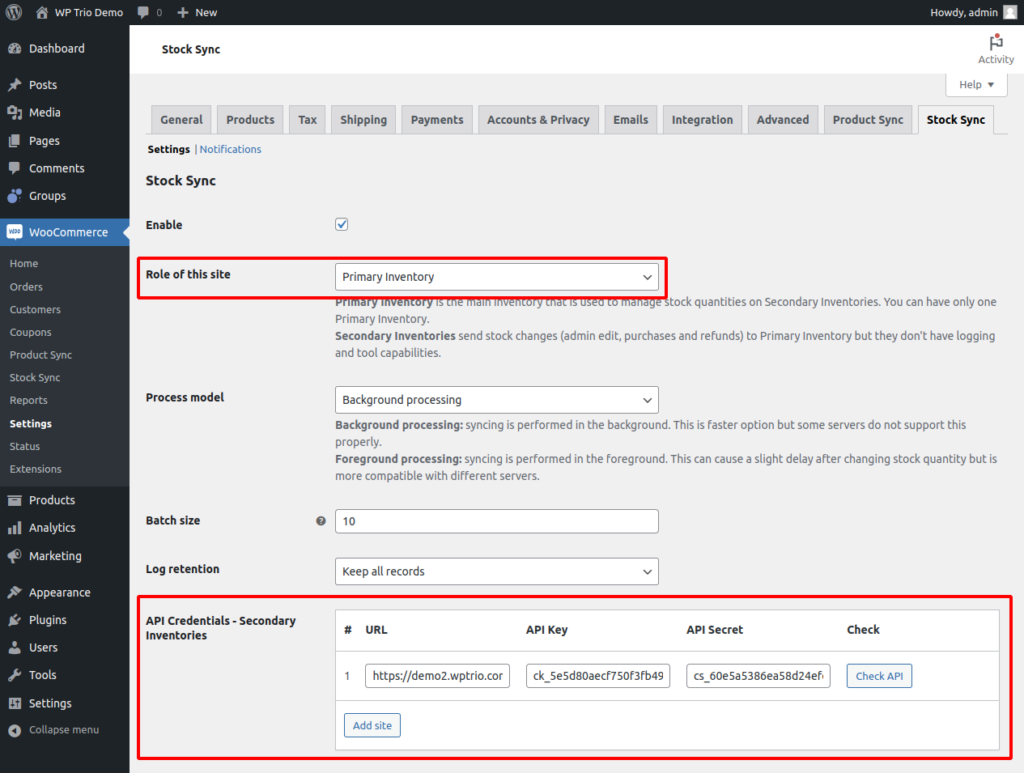
- Go to WooCommerce > Settings > Stock Sync
- Under Role of this site, select Primary Inventory or Secondary Inventory
You can have one Primary Inventory and 1 – 9 Secondary Inventories - Click Save changes to refresh settings
- Click Add site under API Credentials – Primary / Secondary Inventories
- Enter URL of the site which includes https prefix
Example: https://site-a.com - Enter API Key and API Secret which you created in the previous step
- Click Check API to confirm the credentials
- Click Save changes
- Repeat steps 1 – 8 for all sites you wish to connect
Syncing is now operational. The plugin syncs products which SKUs match between the sites and skip the rest. However, we yet need to ensure initial stock quantities are matching between the sites. This is called Initial Sync.

2. Initial Sync
Once the sites have been connected, it’s time to sync stock quantities between the sites.
- Go to the Primary Inventory site
- Check that stock quantities are correct
- Go to WooCommerce > Stock Sync > Tools > Push All
- Click Start pushing
- Click View report »
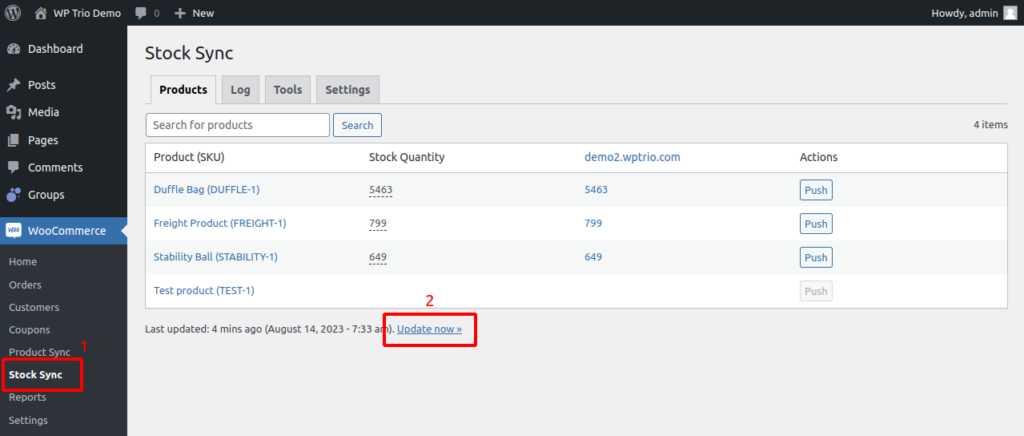
Products with matching SKUs now have same stock quantities on all connected sites. You can view the stock quantities at WooCommerce > Stock Sync > Products.
3. Reporting
WooCommerce Stock Sync Pro has a report page. The report compares products by SKU and displays stock quantities on all sites.
3.1 Update the report
The report page is updated automatically when stock quantities are being changed but it can also be manually updated. This is necessary when the plugin has just been installed and no information yet exists about matching products.
- Go to WooCommerce > Stock Sync
- Click Update now »
- Click Start update
- Click View report » once the update has been completed

